The Resurgence Of Highlight Caps: Your Guide To DIY Dimensional Hair
Discover the enduring appeal of the highlight cap, a timeless tool for achieving stunning dimensional hair color right at home. For decades, this simple yet effective device has empowered individuals to transform their look without the hefty salon price tag. Whether you're aiming for subtle sun-kissed streaks or a bolder, more pronounced effect, the highlight cap offers a unique pathway to personalized hair artistry.
In an era where personal expression through beauty is more valued than ever, the highlight cap is making a significant comeback. It's not just a relic of the past; it's a modernized solution for those seeking affordability, convenience, and creative control over their hair color. This comprehensive guide will delve into everything you need to know about highlight caps, from their mechanics to mastering the technique, ensuring you achieve salon-worthy results from the comfort of your own home.
Table of Contents
- What Exactly is a Highlight Cap?
- Highlight Caps vs. Foil Highlights: A Comparative Look
- The Y2K Comeback: Why Highlight Caps Are Trending Again
- Choosing Your Perfect Highlight Cap
- Step-by-Step Guide to Flawless Cap Highlights at Home
- Troubleshooting Common Highlight Cap Challenges
- Aftercare: Maintaining Your Beautiful Highlights
- Where to Find Your Highlight Cap & Kits
What Exactly is a Highlight Cap?
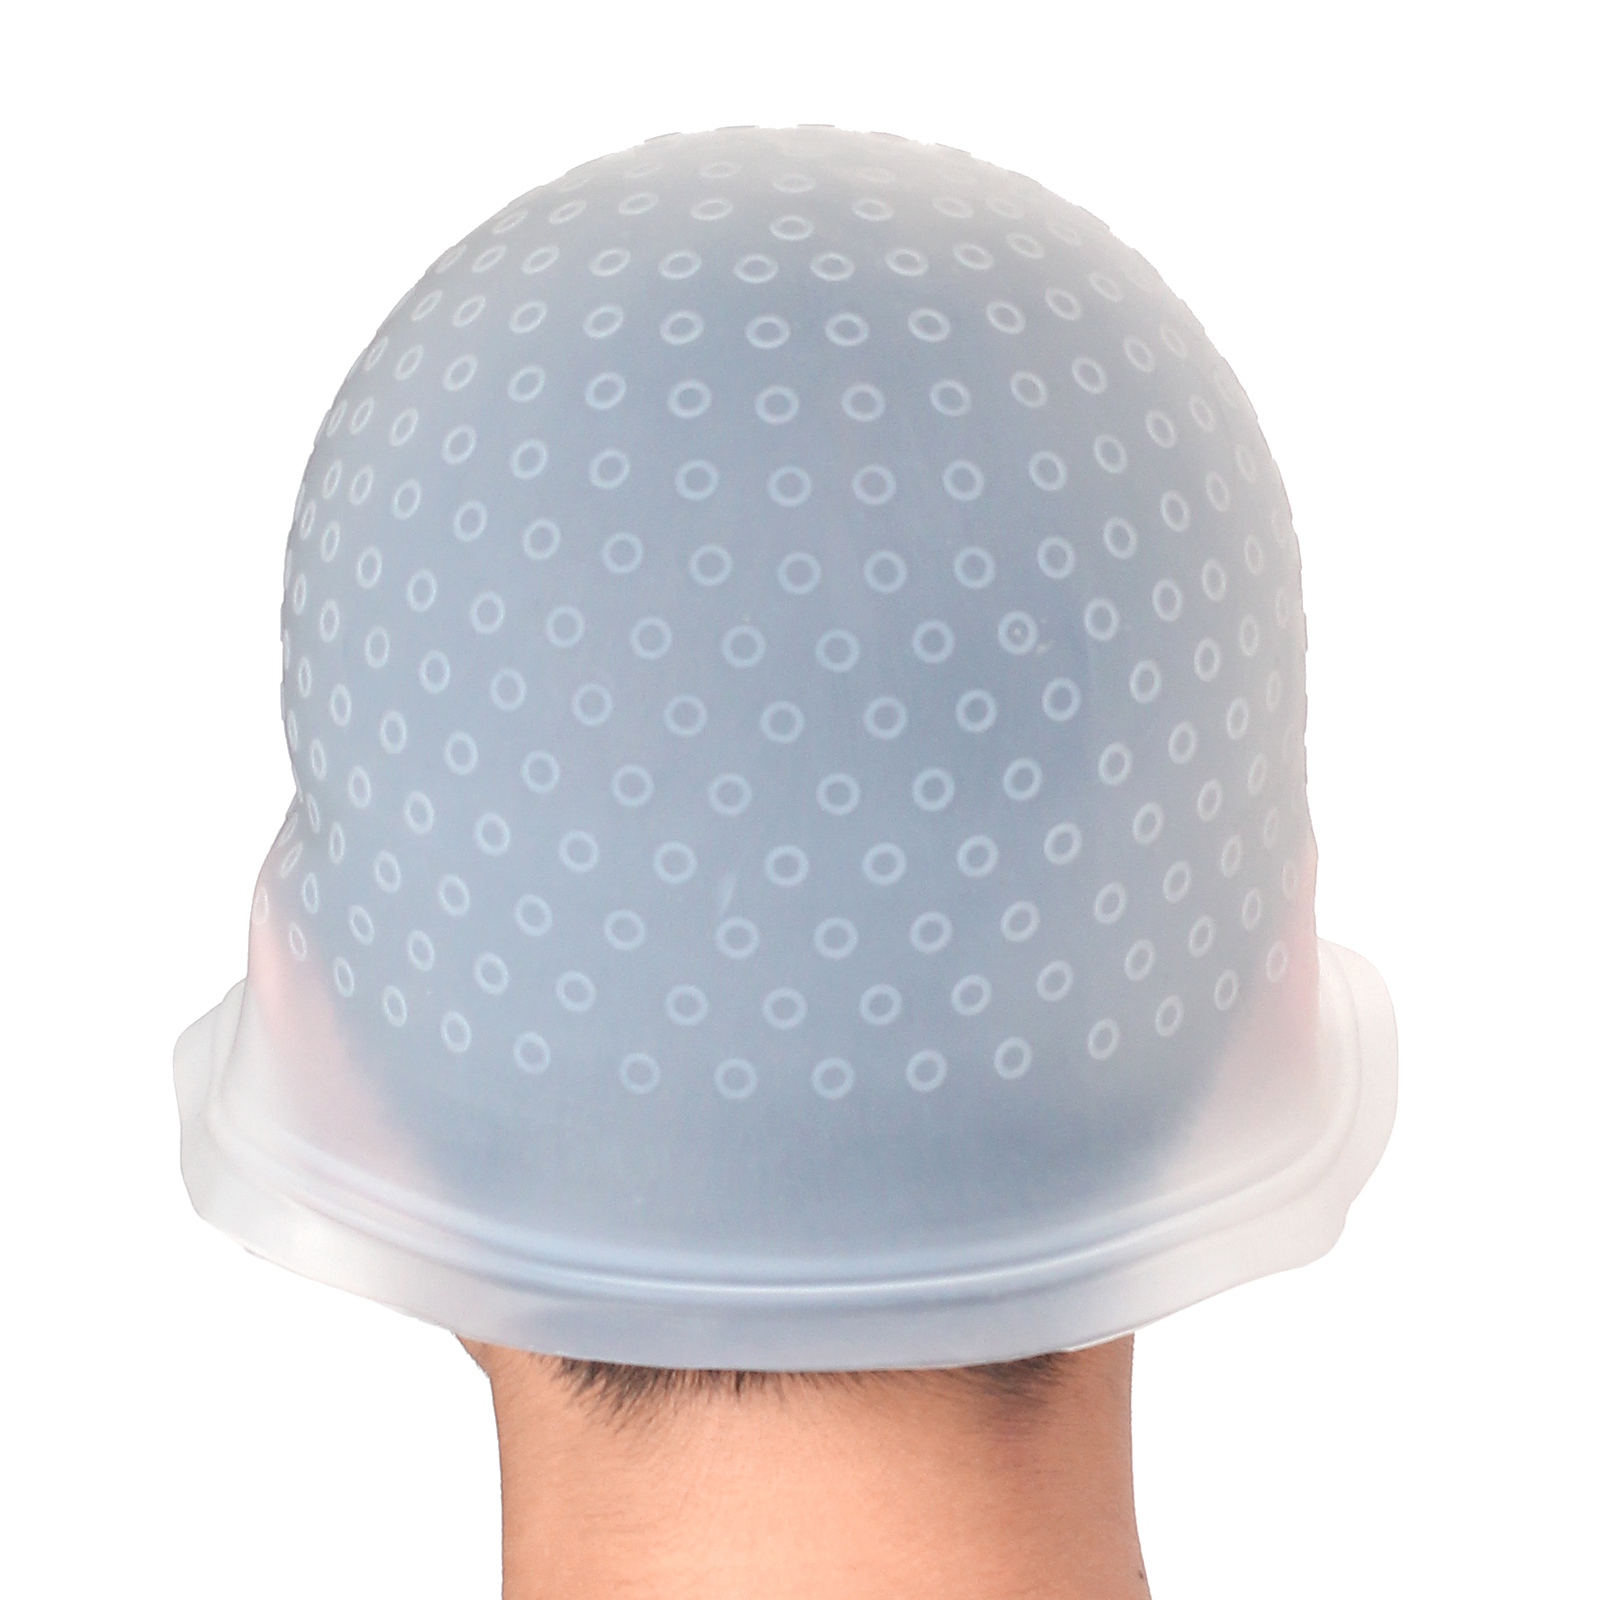
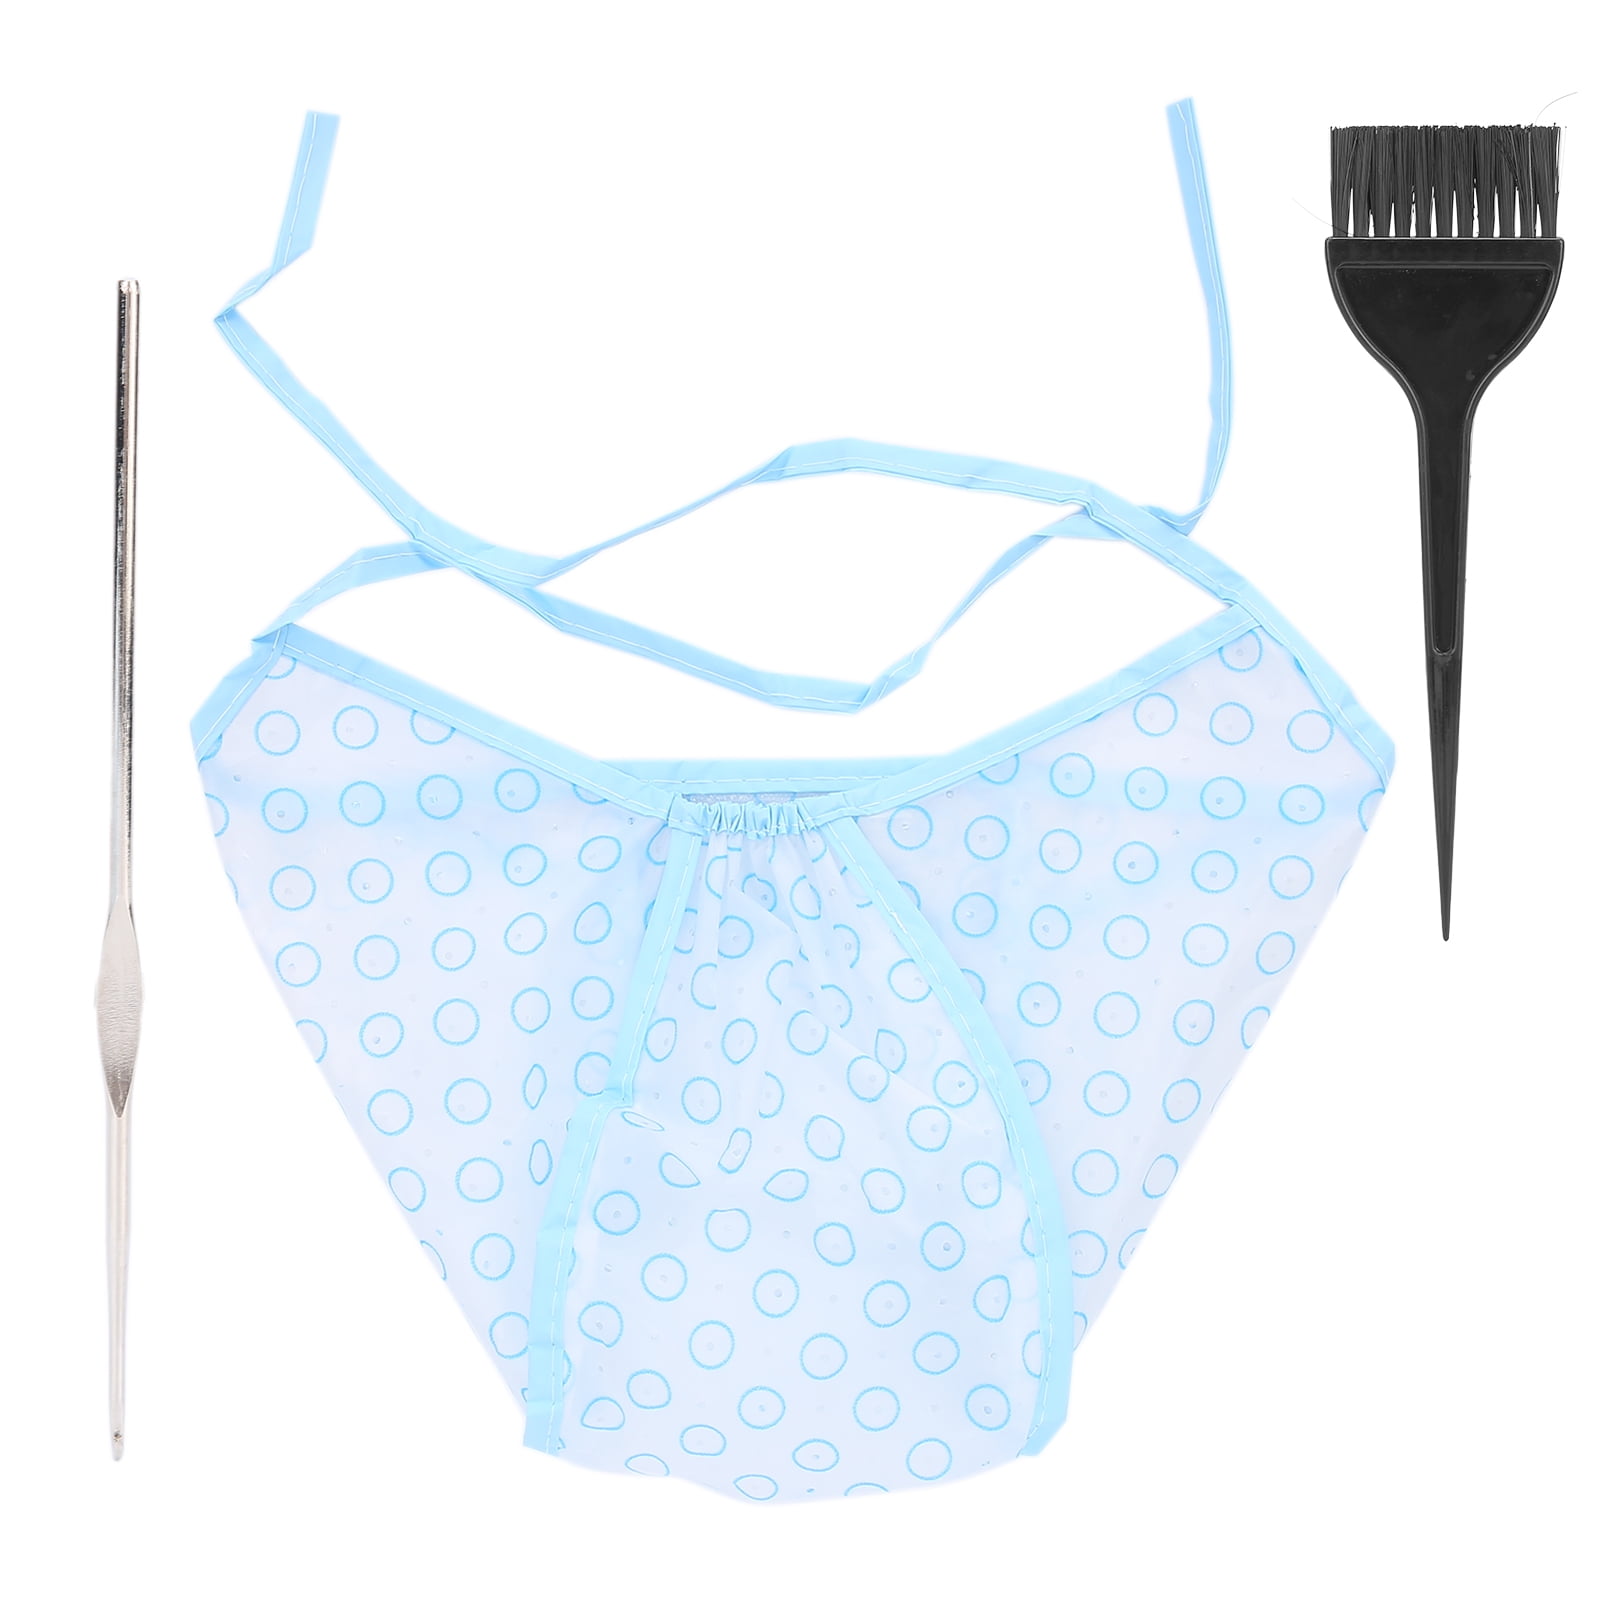
At its core, a highlight cap, also known as a hair coloring dye cap, frosting cap, or tipping cap, is a specialized piece of headwear designed to isolate specific strands of hair for coloring. Imagine a flexible cap, often made of silicone or plastic, dotted with tiny perforations. The magic happens when you place this cap over your head, and then, using a small plastic crochet hook (often included in a "hair coloring kit highlight cap" package), you carefully pull thin sections of your hair through these pre-made or self-poked holes.
The beauty of this method lies in its simplicity. "The cap highlighting method consists on applying highlights with the use of a perforated cap that is placed over the head, the trick is to pull out thin strands of hair with a hook (usually a crochet hook)." This allows you to expose only the hair you wish to lighten or color, protecting the rest of your hair from the dye. Once the desired strands are pulled through, they are then treated with your chosen hair dye or bleach. This technique ensures a consistent and natural-looking distribution of highlights, creating dimension and depth without the need for intricate sectioning or professional assistance. It's a straightforward approach that has made it a popular choice for at-home hair transformations for decades.
Highlight Caps vs. Foil Highlights: A Comparative Look
When it comes to adding dimension to your hair, the two most common methods are highlight caps and foil highlights. While both aim to achieve similar results, their approaches and suitability for different needs vary significantly. Understanding these differences is crucial for choosing the right technique for your desired outcome and skill level. "Learn what cap highlights are, how they differ from foil highlights, and how to use them with l’oréal paris kits" or other home coloring systems.
Simplicity and Affordability
One of the most compelling advantages of the highlight cap is its inherent simplicity and cost-effectiveness. "Cap highlights are a simple and affordable way to achieve dimensional hair color at home." This is particularly evident when you consider the price point; many "hair coloring kit highlight cap" options can be found for as little as "$4.99/count," making them an incredibly accessible option for budget-conscious individuals. The sheer volume of sales, with "100+ bought in past month" for some kits, underscores their popularity as an economical solution. Foils, on the other hand, often require more materials (the foils themselves, specific sectioning clips, and sometimes specialized brushes) and a higher level of technical skill, which can translate to more expensive salon visits or more complex DIY setups.
Control and Precision
While highlight caps excel in simplicity, foil highlights typically offer a higher degree of control and precision, especially for intricate highlighting patterns. With foils, a stylist can meticulously paint individual strands, creating very fine, delicate weaves or bold, chunky sections exactly where desired. This allows for highly customized results, including balayage or ombré effects, which are difficult to achieve with a cap. The cap method, by contrast, provides a more uniform distribution of highlights across the head. "The amount of hair that is chosen to be pulled through each of the cap holes it’s what will determine the amount and thickness of the highlights," giving you some control over density, but not the pinpoint accuracy of foils. For a more natural, all-over highlighted look, the cap is ideal, whereas for highly strategic placement or multi-tonal effects, foils often remain the professional's choice.
Application Ease
For the average home user, the highlight cap wins hands down in terms of ease of application. It's designed for self-application or with minimal assistance. You simply put the cap on, and the perforations guide where the highlights will be placed. This eliminates the need for complex sectioning and weaving techniques that are inherent to foil applications. Foils, while versatile, are notoriously difficult to apply neatly and effectively on oneself, often requiring a second pair of hands or professional expertise. This ease of use is a major reason why the highlight cap remains a favorite for DIY enthusiasts looking to refresh their look without a trip to the salon. The learning curve for cap highlights is significantly shallower, making it an approachable option for beginners.
The Y2K Comeback: Why Highlight Caps Are Trending Again
Fashion and beauty trends are cyclical, and what was once popular inevitably resurfaces with a fresh twist. This is precisely the case with the highlight cap. "Highlighting caps dominated the 90s and early 2000s because they achieved icy frosted tips and chunky highlights." These were the defining looks of an era characterized by bold statements and experimental styles. Think of the iconic frosted tips worn by boy bands or the distinct, contrasting highlights that added edge to many celebrity hairstyles.
As "y2k styles come back into the mainstream," it's no surprise that old hair coloring techniques like highlight caps are resurfacing. Today's resurgence, however, isn't just a carbon copy of the past. "Highlighting caps have received a modern and more conscious update." While the core method remains the same, contemporary trends favor more blended, natural-looking results, even when using a cap. Instead of stark contrasts, people are now using caps to create subtle dimension, add brightness around the face, or achieve a softer, sun-kissed effect. The "frosting cap" of yesteryear has evolved into a versatile tool for modern hair goals, proving that classic techniques can always be reinvented to fit current aesthetics. This renewed interest also stems from a growing DIY culture, where people are more comfortable experimenting with their hair at home, seeking affordable and effective solutions that align with their personal style evolution.
Choosing Your Perfect Highlight Cap
Selecting the right highlight cap is a crucial first step toward achieving your desired hair transformation. The market offers a variety of options, each with slightly different features designed to cater to various needs and preferences. Understanding these differences will help you make an informed decision.
One of the primary distinctions lies in the material: silicone versus plastic. Plastic caps are often more rigid and disposable, making them a good choice for one-time use or for those just experimenting with the technique. Silicone highlight caps, on the other hand, are typically reusable, more flexible, and offer a snugger fit, which can help prevent dye from seeping underneath and causing unwanted spots. Many "reusable silicone hair highlighting cap with holes" are available, emphasizing their durability and eco-friendliness.
Another important consideration is whether the cap comes with pre-perforated holes or requires you to poke your own. Some caps, like the "highlighting cap with holes already in silicone reusable highlighting cap," come with pre-punched holes, offering immediate convenience. However, many silicone caps, particularly those designed for greater customization, do not come with pre-poked holes. As noted by some manufacturers, "Note: the silicone highlight cap doesn't poke holes. please note before buying. this is because everyone may has different style to coloring hair. so you just need to poke holes where you need to drying before coloring." This feature allows for complete control over the placement and density of your highlights, enabling you to create a truly bespoke look. You can decide to poke fewer holes for a subtle effect or more for a bolder statement. When buying a kit, ensure it includes a "plastic crochet hook for dyeing hairdressing" or a "punched hole highlight cap and hook kit" if you need to create your own openings.
Consider the design of the cap itself. Some caps feature a "protective brim" which helps to keep dye away from your face and neck, ensuring a cleaner application. This design also "eliminates the banding effect that often" occurs when dye seeps under the cap, leading to uneven lines of color. For those with longer hair, specific caps are designed to accommodate more volume. "If you want more dramatic highlights, however, choose the best highlighting cap for long hair that has fewer partitions and is one solid color." This suggests that fewer, larger sections of hair can be pulled through for a more impactful look. You can find options like "5 best highlighting cap for long hair" to ensure a comfortable fit and effective highlighting for longer strands.
Finally, check user reviews and ratings. Products like the "highlighting cap with holes tipping caps hair salon hairdressing highlight cap and hook kit (purple) 3.5 out of 5 stars" or "2 sets highlighting cap with hook, silicone highlight cap, hair cap for highlight bleach cap, hair dye cap with holes, highlight caps for dying hair, hair highlight kit for home and salon use(white) 2.8 out of 5 stars" or "3.3 out of 5 stars" indicate varying levels of user satisfaction. While a lower rating might suggest some drawbacks, it often comes down to personal preference and technique. Reading reviews can provide insights into the cap's fit, durability, and ease of use, helping you select a product that aligns with your expectations and skill level.
Step-by-Step Guide to Flawless Cap Highlights at Home
Achieving beautiful, dimensional highlights with a cap is a rewarding DIY project, but it requires careful preparation and precise execution. Follow these steps to ensure a successful and stunning outcome.
Preparation is Key
Before you even think about applying any color, gather all your necessary tools and products. This includes your chosen highlight cap (with a hook if it doesn't have pre-poked holes), your hair bleach or dye kit (make sure it's formulated for highlighting), a non-metallic mixing bowl and applicator brush, a timer, gloves, old towels to protect your clothes and surfaces, and petroleum jelly to protect your hairline. Always perform a patch test 48 hours beforehand to check for allergic reactions and a strand test on a small, hidden section of hair to determine the processing time and desired color result. This step is crucial for preventing damage and ensuring you get the exact shade you want. Ensure your hair is dry and detangled before starting.
The Pulling Technique
This is arguably the most critical part of the cap highlighting process. Place the highlight cap snugly over your head, ensuring all your hair is tucked underneath. If your cap doesn't have pre-poked holes, use your hook to carefully create small, evenly spaced holes where you want your highlights to appear. Now, using the plastic crochet hook, begin pulling thin strands of hair through the holes. The trick is to pull out very thin, consistent sections. "The amount of hair that is chosen to be pulled through each of the cap holes it’s what will determine the amount and thickness of the highlights." For a natural, subtle look, pull fewer, finer strands. For a bolder, more dramatic effect, pull slightly thicker strands through more holes. Work systematically, ensuring an even distribution across your head. Avoid pulling too much hair through one hole, as this can lead to chunky, unnatural-looking highlights or cause the cap to lift and allow bleeding. Once all desired strands are pulled through, comb them gently to ensure they are untangled and evenly spread out on top of the cap.
Application and Processing
With your strands meticulously pulled through, you're ready to apply the color. Mix your bleach or dye according to the manufacturer's instructions. Apply the mixture evenly to all the exposed strands of hair on top of the cap, ensuring complete saturation. "The strands that are not highlighted are then wrapped around the cap and the highlighted strands are left exposed." This refers to the hair underneath the cap being protected, while the pulled-through strands are coated. Be careful not to let the product seep under the cap onto the protected hair. Once applied, set your timer based on the results of your strand test and the product's instructions. Periodically check a small strand by gently scraping off some product to monitor the color development. Do not exceed the maximum processing time recommended by the product. Once the desired lightness or color is achieved, rinse your hair thoroughly with the cap still on, until the water runs clear. This prevents the bleach or dye from touching the unhighlighted hair. Only after thorough rinsing should you carefully remove the cap. Follow up with a neutralizing shampoo and conditioner, typically provided in your dye kit, to seal the cuticle and ensure optimal hair health.
Troubleshooting Common Highlight Cap Challenges
While the highlight cap method is straightforward, even experienced DIYers can encounter a few bumps along the way. Knowing how to troubleshoot common issues can save your hair and your sanity.
One of the most frequent complaints is **uneven results**. This often stems from inconsistent pulling of hair strands. If some sections are thicker or thinner than others, they will process differently, leading to an uneven look. To avoid this, always aim for uniform strand thickness when pulling hair through the holes. If you find your highlights are patchy, it might be due to insufficient product application or uneven distribution. Ensure every exposed strand is thoroughly saturated with dye.
**Bleeding**, where the dye seeps under the cap and stains the unhighlighted hair, is another common concern. This usually happens if the cap isn't snug enough, if too much hair is pulled through one hole causing the cap to lift, or if too much product is applied causing it to overflow. To prevent bleeding, ensure your cap fits tightly around your head. If your cap has a "protective brim," it can significantly help. Apply petroleum jelly around your hairline for an extra barrier. When applying the dye, use just enough to saturate the strands, avoiding excessive piling of product.
**Hair damage or brassiness** can occur if the processing time is too long or if the wrong product is used. Always, always perform a strand test to determine the ideal processing time for your hair type. If your highlights turn brassy (orange or yellow tones), it means the hair didn't lift enough. You might need a toner specifically designed to neutralize these unwanted warm tones. For future attempts, consider a stronger developer or a longer processing time (within safe limits) if your hair is naturally dark and resistant to lifting. Over-processing, on the other hand, can lead to brittle, damaged hair. If your hair feels gummy or overly elastic after rinsing, it's a sign of damage. In such cases, deep conditioning treatments and professional advice are highly recommended.
Finally, if you find the **hook is difficult to use** or pulls too much hair, try a different angle or a hook with a finer tip. Sometimes, wetting the hair slightly before putting on the cap can make it easier to pull strands through, but ensure the hair is dry before applying any chemical.
Aftercare: Maintaining Your Beautiful Highlights
Once you've successfully achieved your desired highlights, the work isn't over. Proper aftercare is paramount to maintaining the vibrancy, health, and longevity of your newly colored hair. Neglecting post-coloring care can lead to dullness, brassiness, and damage, undoing all your hard work.
"Once you’ve highlighted your hair using a highlighting cap, be sure to keep it looking good by using a hair care product that matches your hair type and style." This isn't just a recommendation; it's a necessity. Invest in sulfate-free shampoos and conditioners specifically formulated for color-treated hair. Sulfates can strip color, causing your highlights to fade prematurely. Look for products that contain ingredients designed to protect color and nourish bleached or dyed strands.
Deep conditioning treatments and hair masks should become a regular part of your routine, at least once a week. Highlighting, especially with bleach, can be drying and damaging to the hair cuticle. These treatments help to replenish moisture, strengthen the hair shaft, and restore shine and softness. Leave-in conditioners and hair oils can also provide an extra layer of protection and hydration throughout the day.
Protect your hair from heat styling. Excessive heat from blow dryers, flat irons, and curling irons can cause highlights to fade and become brassy, as well as lead to further damage. Always use a heat protectant spray before styling with heat, and opt for lower temperature settings. Air-drying your hair whenever possible is also a great way to minimize heat exposure.
Consider using purple or blue toning shampoos and conditioners periodically if you notice any brassy or yellow tones creeping into your highlights. These products contain pigments that neutralize unwanted warm hues, helping to maintain that cool, fresh look. However, use them sparingly, as overuse can sometimes tint your hair purple or blue.
Finally, protect your hair from environmental aggressors. UV rays from the sun can fade highlights, so consider wearing a hat when outdoors for extended periods or using hair products with UV filters. Chlorine from swimming pools can also strip color and cause discoloration; wet your hair with clean water and apply a leave-in conditioner before swimming to create a barrier.
Where to Find Your Highlight Cap & Kits
The accessibility of highlight caps and related kits has never been greater, making it incredibly easy to embark on your DIY hair coloring journey. You can find a wide array of options both online and in physical beauty supply stores.
Online marketplaces are a treasure trove for highlighting supplies. "Get the best deals on hair highlighting cap when you shop the largest online selection at ebay.com," where you can often find "free shipping on many items | browse your favorite brands | affordable prices." Beyond eBay, major e-commerce platforms like Amazon also offer extensive selections, ranging from individual caps to comprehensive kits. You'll find options like "12 pcs 4 sets of highlight cap with hooks," which are great for those who highlight frequently or want to stock up. There are also "2 sets highlighting cap with hook, silicone highlight cap, hair cap for highlight bleach cap, hair dye cap with holes, highlight caps for dying hair, hair highlight kit for home and salon use(white)" available, providing flexibility for both personal and professional use.
For those who prefer to see products in person or seek professional-grade supplies, beauty supply stores are an excellent resource. "Shop for highlighting cap single from salon care at sally beauty," a well-known retailer that caters to both professionals and home users. These stores often carry a variety of brands and types of caps, including those made from durable silicone and complete kits that include everything you need, such as the "punched hole highlight cap and hook kit." Purchasing from a beauty supply store allows you to ask questions to knowledgeable staff and feel the quality of the products before buying.
When shopping, pay attention to the product descriptions and customer reviews. As mentioned earlier, some silicone caps might require you to poke your own holes, so ensure the kit includes a hook if needed. Look for kits that offer a complete solution, including the cap, hook, and sometimes even gloves and mixing tools, to ensure you have everything necessary for a smooth application process. The wide availability and variety mean you can easily find a highlight cap solution that fits your budget, skill level, and desired results.
In conclusion, the highlight cap stands as a testament to the enduring appeal of accessible, DIY beauty. From its nostalgic roots in the 90s and early 2000s to its modern resurgence, this simple tool continues to empower individuals to achieve stunning, dimensional hair color at home. It offers an affordable and straightforward alternative to salon services, providing a unique blend of control and convenience.
By understanding what a highlight cap is, how it differs from foils, and mastering the step-by-step application process, you can confidently transform your hair with beautiful, natural-looking results. Remember the importance of proper cap selection, meticulous hair pulling, and diligent aftercare to ensure your highlights remain vibrant and healthy. So, why wait? Embrace the art of at-home hair coloring. Pick up a highlight cap kit today and discover the creative freedom it offers. Have you tried cap highlights before? Share your experiences and tips in the comments below!
Highlight Cap With Cut Hairdressing Skylar's Hair Beauty, 54% OFF
Highlight cap - stockstews
Zerodis Highlight Cap Highlight Tool Hair Highlights Cap Set Reusable
